Cumulus Backup and Restore
Deployment Backup and Restore
Most of your Cumulus deployment can be recovered by redeploying via Terraform. However, the Cumulus metadata including providers, collections, granules, rules, and executions that are stored in DynamoDB, and concurrently being written to the Core Postgres instance can only be restored if backup was properly configured or enabled. If a deployment is lost, logs and Step Function executions in the AWS console will be irrecoverable.
Postgres Database
Please note
-
Cumulus supports a "bring your own" Postgres instance approach, however our reference implementation utilizes a serverless Aurora/RDS database - as such this reference provides AWS RDS Aurora Serverless backup options.
-
Data storage has transitioned from the use of a DynamoDB backed primary database to a Postgres instance with a reference Aurora/RDS Postgres compatible module. In this mode, the primary data records are still being written to DynamoDB (and replicated to Elastic Search), however replicated writes are being written to the required Postgres instance. As such, the primary source of recovery should be considered to be a re-migration of data from the primary database.
Backup and Restore
Re-migration
The Postgres database is not the primary data store - as such, the simplest recovery approach is to re-deploy your database instance (e.g. your RDS cluster) and re-run the database data migration module to migrate Collections, Providers, etc, from a (possibly recovered DynamoDB instance) then begin active migration of Files and Granules records.
For larger datastores this approach may not work due to migration time/other limitations. In that case, utilizing an RDS recovery approach in conjunction with the Dynamo to RDS reconciliation tooling may be appropriate.
Backup and Restore with AWS RDS
Configuring Database Backups
For AWS RDS Aurora database deployments, AWS provides a host of database backup/integrity options, including PITR (Point In Time Recovery) based on automated database backups and replay of transaction logs.
For further information on RDS backup procedures, see the AWS documentation
Disaster Recovery
To recover a Cumulus Postgres database in a disaster or data-loss scenario, you should perform the following steps:
- If the Postgres database cluster exists/is still online, halt workflow activity, then take the cluster offline/remove access.
- If needed, recover the DynamoDB tables as noted in the DynamoDb section of this document.
- Redeploy a new database cluster from your backup, matching as closely as possible to (but prior to) the DynamoDB restore time. See AWS's PIT recovery instructions and DB Snapshot recovery instructions, or the examples below for more information.
- Configure your Cumulus deployment to utilize the new database cluster and re-deploy.
- Run DynamoDB/RDS reconciliation tools and resolve any discrepancies.
cumulus-rds-tf examples
The following sections provide a walk through of a few recovery scenarios for the provided cumulus-rds-tf
serverless module.
Point In Time Recovery
If you need recovery that exceeds the 1-day granularity of AWS's snapshots, you either must create and manually manage snapshots, or use Point In Time Recovery (PITR) if you still have the original cluster available.
Unfortunately as terraform does not yet support RDS PITR (see: github terraform-provider issue #5286), this requires a manual procedure.
If you are using the cumulus-rds-tf module to deploy an RDS Aurora Serverless
Postgres cluster, the following procedure can be used to successfully spin up a duplicate
cluster from backup in recovery scenarios where the database cluster is still viable:
1. Halt all ingest and remove access to the database to prevent Core processes from writing to the old cluster.
Halt Ingest
Deactivate all Cumulus Rules, halt all clients that access the archive API and stop any other database accessor processes. Ensure all active executions have completed before proceeding.
Remove Database Cluster Access
Depending on your database cluster configuration, there are several ways to limit access to the database. One example:
Log in as the administrative user to your database cluster and run:
alter database my_database connection limit 0;
select pg_terminate_backend(pg_stat_activity.pid) from pg_stat_activity where pg_stat_activity.datname = 'database';
This should block new connections to the Core database from the database user and cause database writes to fail.
Note that it is possible in the above scenario to remove access to your datastore for your administrative user. Use care.
2. Using the AWS CLI (see AWS PITR documentation for console instructions), making certain to use the same subnet groups and vpc-security-group IDs from your Core deployment, run the following command:
aws rds restore-db-cluster-to-point-in-time --source-db-cluster-identifier "<cluster-needing-restoration>" --restore-to-time "<time>" --vpc-security-group-ids "<security-group-1>" "<security-group-2>" --copy-tags-to-snapshot --db-cluster-identifier "<new-cluster-identifier>" --db-subnet-group-name "<db-subnet-group>"
You can get the configuration vales from the RDS console or by running the following command and parsing the outputs:
aws rds describe-db-clusters
-
cluster-needing-restoration -- the name of the database cluster you're restoring from (
DBClusterIdentifierfrom the AWS RDS CLI output) -
time - The time in UTC format (e.g. 2015-03-07T23:45:00Z)
-
security-group-# - the security group IDs from your original deployment
-
new-cluster-identifier - The cluster name for the backup replica. This must be different than the original
-
db-subnet-group - The db subnet group created for the original cluster (
DBSubnetGroupfrom the AWS RDS CLI output)Once this command is run, you should see the cluster appear in the RDS cluster list with a
Creatingstatus. Verify the creating cluster has a configuration similar to the cluster it is replacing. Once the cluster is online, manually validate that it has the tables/data you expect, then proceed.
3. Import cluster into terraform state
Run the following commands to bring the new cluster into the terraform state file, where {module_name} is the title you've assigned to the module:
- Remove the old cluster from your terraform state:
terraform state rm module.{module_name}.aws_rds_cluster.cumulus
- Add the restored cluster to your terraform state:
terraform import module.{module_name}.aws_rds_cluster.cumulus <new cluster identifier>
4. Update module terraform.tfvars or your rds cluster module such that the cluster_identifier variable matches the new database cluster
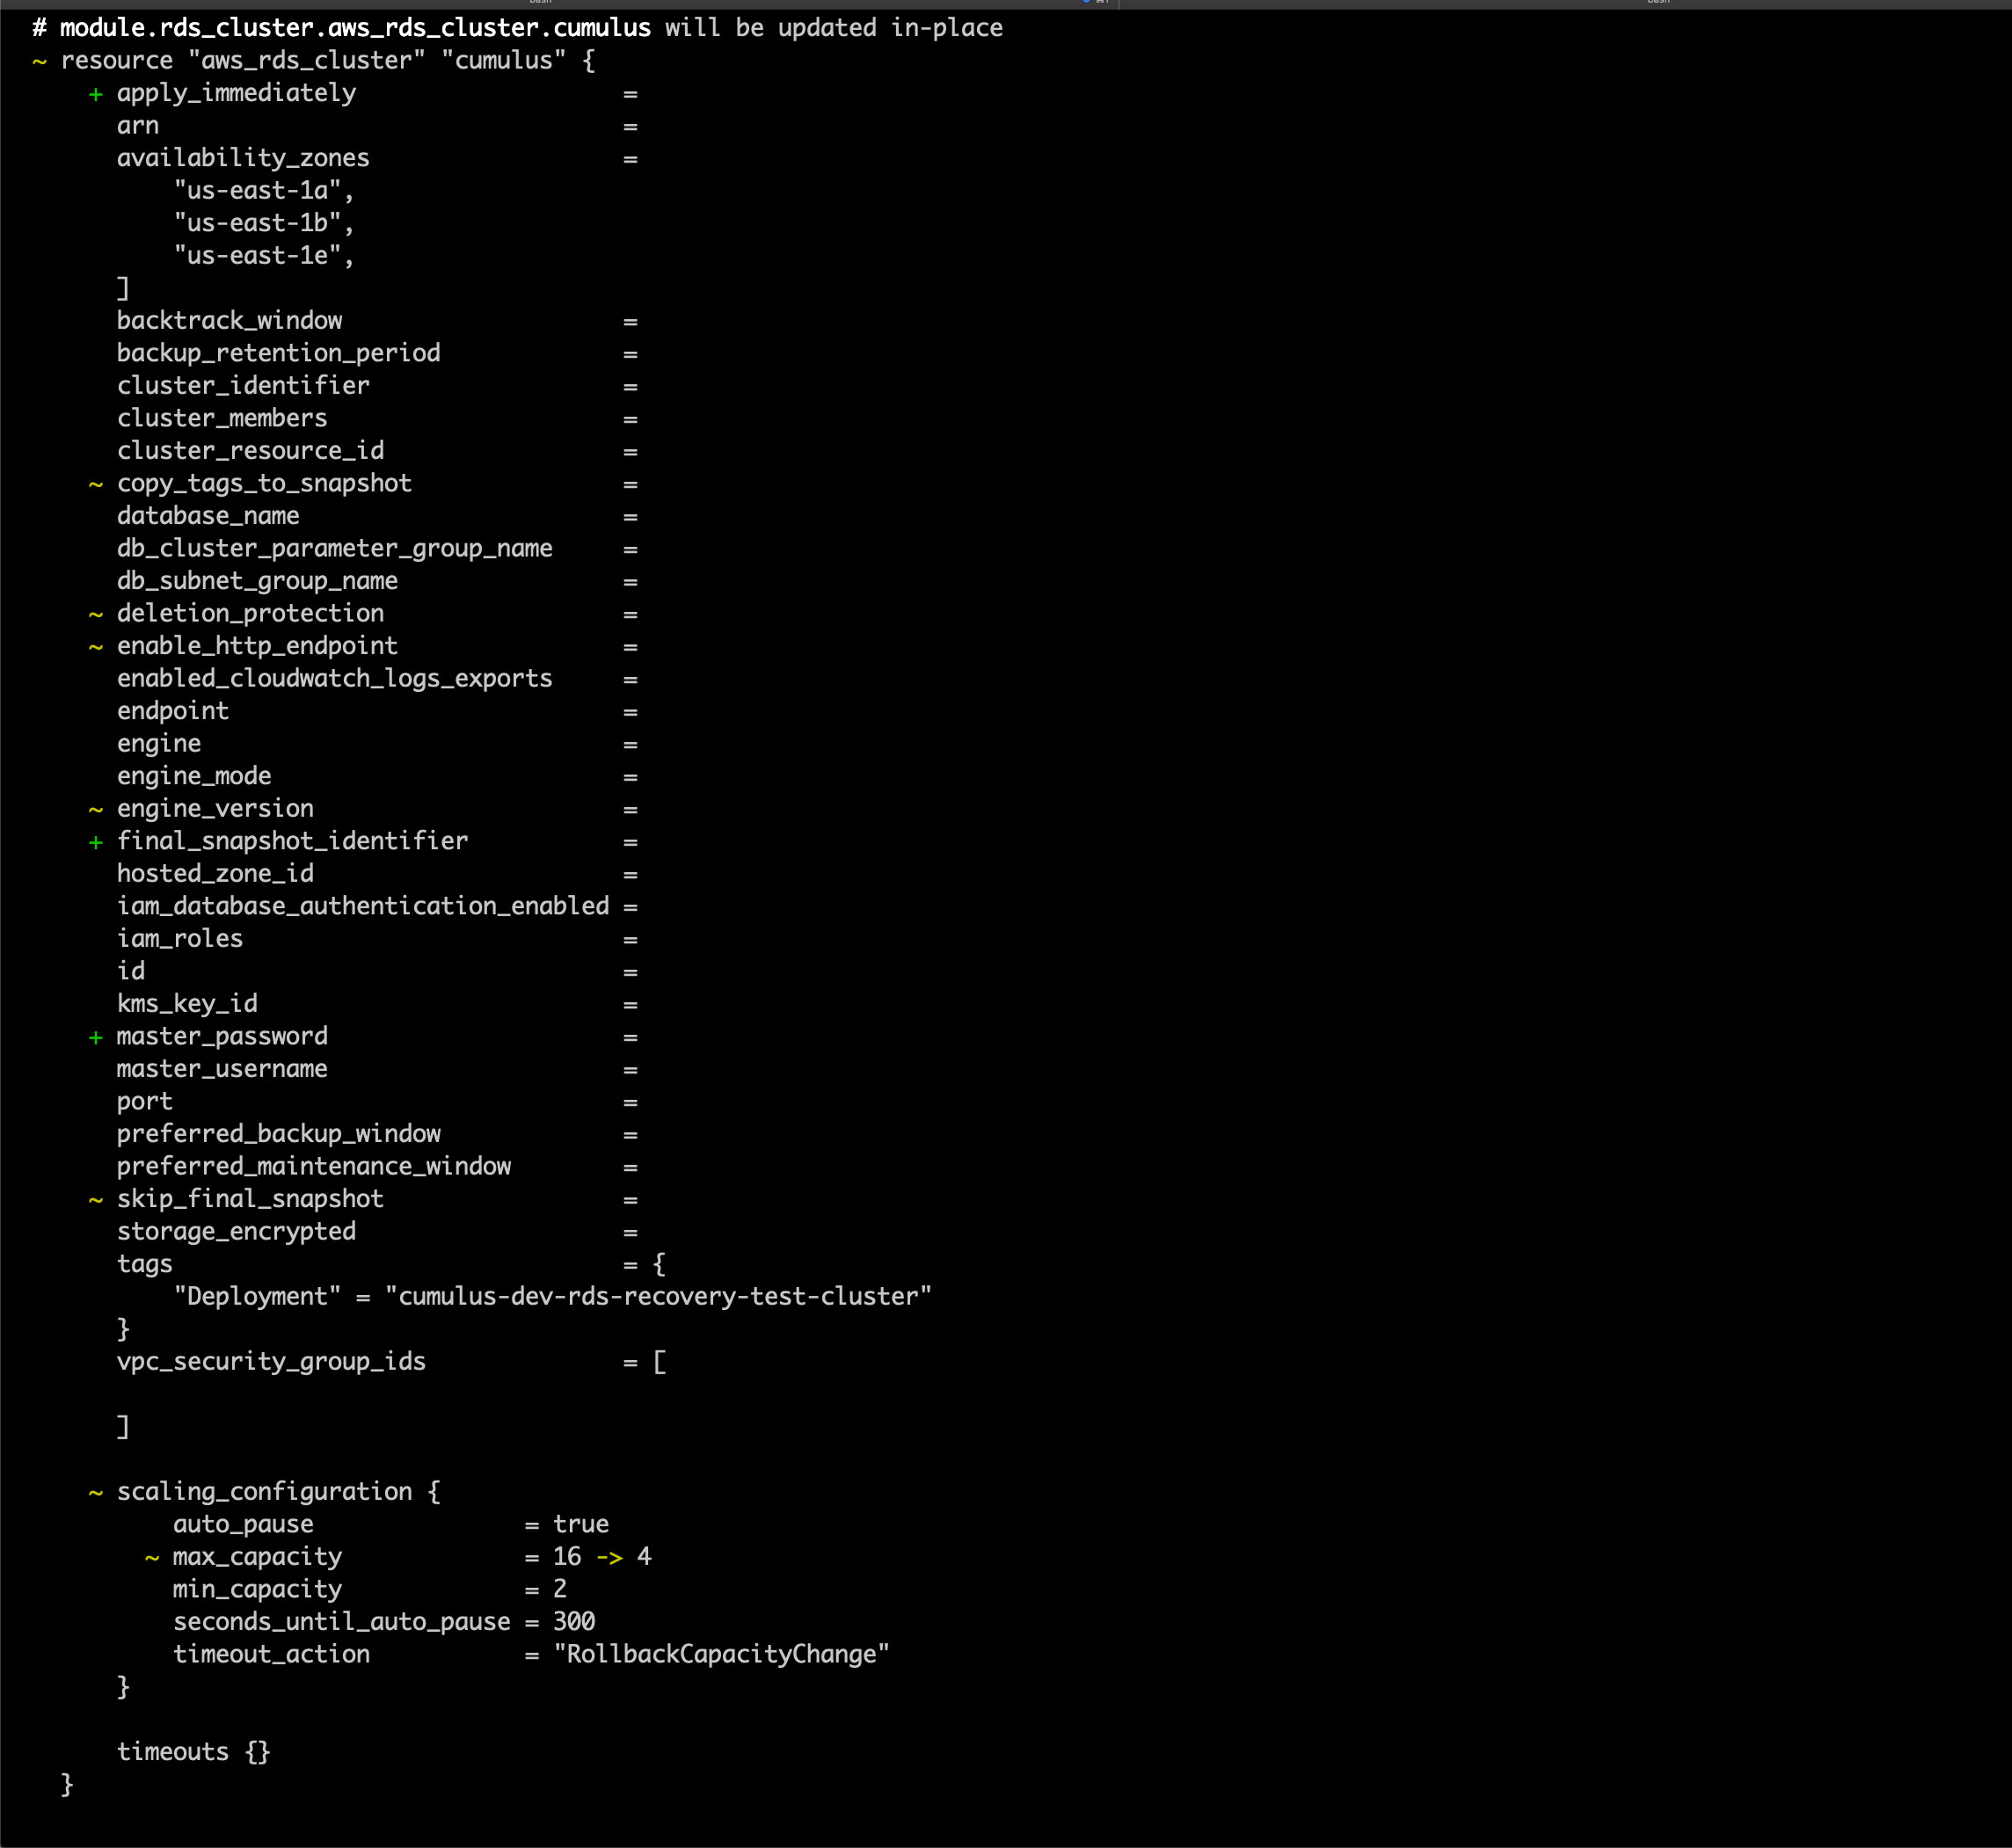
5. Run a terraform plan. Be very careful to ensure that the module.rds_cluster.aws_rds_cluster.cumulus resource is not being recreated as this will wipe the postgres database. You should expect to see the cluster be modified, not replaced, and the rds_login secret version will be replaced, as the host name will change
You should expect to see output that looks like the following (with sensitive identifiers removed):
and

Once everything looks acceptable, run:
terraform apply
6. Redeploy Cumulus - you shouldn't need to reconfigure Core, as the secret ARN and the security group should not change, however double-check the configured values are as expected
Snapshot Recovery
A RDS cluster can be recreated from a manually created snapshot
or one of your automated backups. These backups do not require a live cluster,
and can be used for recovery in case of accidental deletion or full cluster/backup failure. The
terraform module supports the variable snapshot identifier - this
variable, when set, will on cluster creation utilize an existing snapshot to
create a new cluster.
To restore a snapshot as a new cluster:
-
Halt all ingest and remove access to the database to prevent Core processes from writing to the old cluster.
-
Set the
snapshot_identifiervariable to the snapshot you wish to create, and configure the module like a new deployment, with a uniquecluster_identifier -
Deploy the module using
terraform apply -
Once deployed, verify the cluster has the expected data, then update Core to utilize the new cluster/security groups and redeploy.
DynamoDB
Backup and Restore with AWS
You can enable point-in-time recovery (PITR) as well as create an on-demand backup for your Amazon DynamoDB tables.
PITR provides continuous backups of your DynamoDB table data. PITR can be enabled through your Terraform deployment, the AWS console, or the AWS API. When enabled, DynamoDB maintains continuous backups of your table up to the last 35 days. You can recover a copy of that table to a previous state at any point in time from the moment you enable PITR, up to a maximum of the 35 preceding days. PITR provides continuous backups until you explicitly disable it.
On-demand backups allow you to create backups of DynamoDB table data and its settings. You can initiate an on-demand backup at any time with a single click from the AWS Management Console or a single API call. You can restore the backups to a new DynamoDB table in the same AWS Region at any time.
PITR gives your DynamoDB tables continuous protection from accidental writes and deletes. With PITR, you do not have to worry about creating, maintaining, or scheduling backups. You enable PITR on your table and your backup is available for restore at any point in time from the moment you enable it, up to a maximum of the 35 preceding days. For example, imagine a test script writing accidentally to a production DynamoDB table. You could recover your table to any point in time within the last 35 days.
On-demand backups help with long-term archival requirements for regulatory compliance. On-demand backups give you full-control of managing the lifecycle of your backups, from creating as many backups as you need to retaining these for as long as you need.
Enabling PITR during deployment
By default, the Cumulus data-persistence module enables PITR on the default tables listed in the module's variable defaults for enable_point_in_time_tables. At the time of writing, that list includes:
- AsyncOperationsTable
- CollectionsTable
- ExecutionsTable
- FilesTable
- GranulesTable
- PdrsTable
- ProvidersTable
- RulesTable
If you wish to change this list, simply update your deployment's data_persistence module (here in the template-deploy repository) to pass the correct list of tables.
Restoring with PITR
Restoring a full deployment
If your deployment has been deleted all of your tables with PITR enabled will have had backups created automatically. You can locate these backups in the AWS console in the DynamoDb Backups Page or through the CLI by running:
aws dynamodb list-backups --backup-type SYSTEM
You can restore your tables to your AWS account using the following command:
aws dynamodb restore-table-from-backup --target-table-name <prefix>-CollectionsTable --backup-arn <backup-arn>
Where prefix matches the prefix from your data-persistence deployment. backup-arn can be found in the AWS console or by listing the backups using the command above.
This will restore your tables to AWS. They will need to be linked to your Terraform deployment. After terraform init and before terraform apply, run the following command for each table:
terraform import module.data_persistence.aws_dynamodb_table.collections_table <prefix>-CollectionsTable
replacing collections_table with the table identifier in the DynamoDB Terraform table definitions.
Terraform will now manage these tables as part of the Terraform state. Run terrform apply to generate the rest of the data-persistence deployment and then follow the instructions to deploy the cumulus deployment as normal.
At this point the data will be in DynamoDB, but not in Elasticsearch, so nothing will be returned on the Operator dashboard or through Operator API calls. To get the data into Elasticsearch, run an index-from-database operation via the Operator API. The status of this operation can be viewed on the dashboard. When Elasticsearch is switched to the recovery index the data will be visible on the dashboard and available via the Operator API.
Restoring an individual table
A table can be restored to a previous state using PITR. This is easily achievable via the AWS Console by visiting the Backups tab for the table.
A table can only be recovered to a new table name. Following the restoration of the table, the new table must be imported into Terraform.
First, remove the old table from the Terraform state:
terraform state rm module.data_persistence.aws_dynamodb_table.collections_table
replacing collections_table with the table identifier in the DynamoDB Terraform table definitions.
Then import the new table into the Terraform state:
terraform import module.data_persistence.aws_dynamodb_table.collections_table <new-table-name>
replacing collections_table with the table identifier in the DynamoDB Terraform table definitions.
Your data-persistence and cumulus deployments should be redeployed so that your instance of Cumulus uses this new table. After the deployment, your Elasticsearch instance will be out of sync with your new table if there is any change in data. To resync your Elasticsearch with your database run an index-from-database operation via the Operator API. The status of this operation can be viewed on the dashboard. When Elasticsearch is switched to the new index the DynamoDB tables and Elasticsearch instance will be in sync and the correct data will be reflected on the dashboard.
Backup and Restore with cumulus-api CLI
cumulus-api CLI also includes a backup and restore command. The CLI backup command downloads the content of any of your DynamoDB tables to .json files. You can also use these .json files to restore the records to another DynamoDB table.
Backup with the CLI
To backup a table with the CLI, install the @cumulus/api package using npm, making sure to install the same version as your Cumulus deployment:
npm install -g @cumulus/api@version
Then run:
cumulus-api backup --table <table-name>
the backup will be stored at backups/<table-name>.json
Restore with the CLI
To restore data from a json file run the following command:
cumulus-api restore backups/<table-name>.json --table <table-name>
The restore can go to the in-use table and will update Elasticsearch. If an existing record exists in the table it will not be duplicated but will be updated with the record from the restore file.
Data Backup and Restore
Cumulus provides no core functionality to backup data stored in S3. Data disaster recovery is being developed in a separate effort here.