Grafana
Grafana Hermes Data Source Plugin
Hermes offers a Grafana Datasource plugin to easily query Hermes telemetry and events data from TimescaleDB. The plugin offers a visual query builder, which you can use to query and aggregate telemetry and events data. Additionally you can manually write queries using the raw SQL editor.
You can set this up quickly using Hermes's default docker compose which includes TimescaleDB, Grafana, and the plugin. Check out using Grafana with TimescaleDB.
Installing the Hermes Data Source Plugin
The Hermes data source plugin is distributed as a release asset on GitHub.
- If you are using the default docker compose, the plugin is pre-installed with a pinned version, and you can skip directly to verifying the installation.
- Otherwise, you need to install the plugin following the steps below. Also, because it is unsigned, Grafana must be configured to allow it in addition to installing the files.
After allowing the unsigned plugin, pick the method that matches your setup:
- Install to Docker Compose — use Grafana's built-in plugin installer with a pinned version (recommended).
- Install to an existing Grafana instance — run the install script to get the latest release.
- Install to a single Docker container — mount a host directory.
Allowing the Unsigned Plugin
Grafana will not load the plugin unless it is explicitly allowed. Use whichever applies to your setup:
-
Environment variable (used in the Docker examples below):
-
grafana.iniunder[plugins]:
Restart Grafana after changing grafana.ini.
Install to Docker Compose
This is the recommended approach. Use Grafana's built-in GF_INSTALL_PLUGINS environment variable to install the plugin automatically. This is the approach used in the default docker-compose.yml.
The recommended URL uses GitHub's latest redirect so you always track the newest release without editing the version by hand:
services:
  grafana:
    image: grafana/grafana:latest
    restart: unless-stopped
    ports:
      - "3000:3000"
    environment:
+     GF_INSTALL_PLUGINS: "https://github.com/nasa/hermes/releases/latest/download/nasa-hermes-datasource.zip;nasa-hermes-datasource"
+     GF_PLUGINS_ALLOW_LOADING_UNSIGNED_PLUGINS: "nasa-hermes-datasource"
    volumes:
      - grafana-data:/var/lib/grafana

volumes:
  grafana-data:
The plugin is downloaded and installed automatically when the container starts. Recreating the container picks up the newest release automatically. latest tracks the most recent non-prerelease release.
If you prefer to pin a specific version instead, point GF_INSTALL_PLUGINS at a versioned release URL from the releases page and update it when upgrading:
    environment:
      GF_INSTALL_PLUGINS: "https://github.com/nasa/hermes/releases/download/v5.0.0/nasa-hermes-datasource-5.0.0.zip;nasa-hermes-datasource"
      GF_PLUGINS_ALLOW_LOADING_UNSIGNED_PLUGINS: "nasa-hermes-datasource"
Install to an Existing Grafana Instance
The install script downloads the latest published release and extracts it into
your Grafana plugins directory. It requires jq.
curl -fsSL https://raw.githubusercontent.com/nasa/hermes/main/grafana-datasource-plugin/install.sh | bash
The script auto-detects a plugins directory. To install into a specific directory,
pass it as an argument (everything after bash -s -- is passed to the script):
curl -fsSL https://raw.githubusercontent.com/nasa/hermes/main/grafana-datasource-plugin/install.sh \
  | bash -s -- /var/lib/grafana/plugins
The plugin is installed to <plugins-dir>/nasa-hermes-datasource/. Then
allow the unsigned plugin and restart Grafana.
Install to a Single Docker Container
Install the plugin into a host folder, then mount it into the container:
# Install the plugin into a host folder
mkdir -p ~/grafana-plugins
curl -fsSL https://raw.githubusercontent.com/nasa/hermes/main/grafana-datasource-plugin/install.sh \
  | bash -s -- ~/grafana-plugins

# Start Grafana with the plugin mounted and allowed
docker run -d -p 3000:3000 \
  -e GF_PLUGINS_ALLOW_LOADING_UNSIGNED_PLUGINS=nasa-hermes-datasource \
  -v ~/grafana-plugins:/var/lib/grafana/plugins \
  --name grafana grafana/grafana:latest
Verifying the Installation
Open http://localhost:3000 (default login admin /
admin), then navigate to Administration → Plugins and data → Plugins and
search for hermes. The Hermes data source should appear in the list, marked
as an unsigned plugin.
If it does not appear, confirm the plugin was extracted into the correct plugins directory and that unsigned plugins are allowed.
Using the Hermes Data Source Plugin
We will be using the default docker compose, which comes with a TimescaleDB instance located at timescaledb:5432 in this tutorial. Once the plugin is installed, we can configure the Hermes data source by navigating to Connections → Data sources. You should see a Hermes data source. If you do not see one, add a new data source with type Hermes. Next, fill out the connection information. The default config parameters are shown in the screenshot below, with password password. Once done, click Save & test to test the connection.

Note
We may add a Hermes field to the connection settings, which would connect to the Hermes backend for dictionary information. You can use host.docker.internal:port to connect to a Hermes instance outside of the docker, on your host machine.
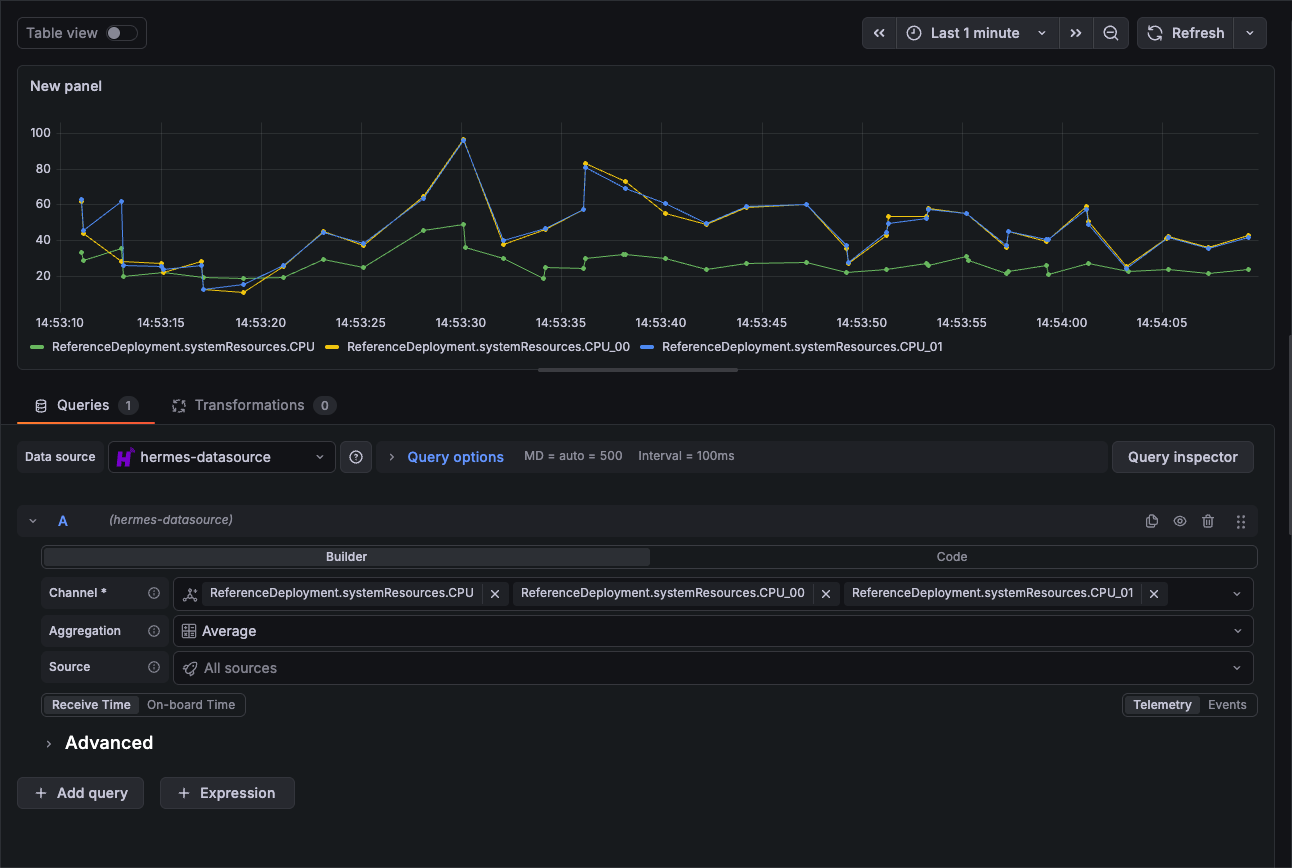
Once connected, we can visualize the data. Navigate to the Dashboards page and create a new dashboard. Add a panel and select Configure visualization on the panel. A query editor should pop up, as shown in the screenshot below. You can query your data using the form, starting with selecting the Hermes data source. The query will be automatically sent when you fill out a box. You can also use the refresh button on the top right to send the query.
